How To Create Your Own Song And Compose Music With Mixcraft 6
NOTE: This post is only for home experiments and individual use. This post and softwares can't be used for commercial purpose.
 Hello friends, do you have a good voice to
 sing , do u have the talent to write songs, do you have the feelings to compose a soothing or rocking music, if you have, then why don't you write your own songs and record them in your voice with your own composed music.
I have all these talents and that's why I compose my own music andwrite my own songs and to make them alive, I record them also.
You might be thinking that you will have to purchase different musical instruments and go to studios and record your songs there. But NO, you can do all these things alone, just with your PC and the superb software, Acoustica Mixcraft 6.
I use plugins of FL Studio and SonySound Forge Pro also, but all the work is done in Mixcraft only.
You can also create your own albums at your home, without help of any music-man, just on your own PC or Laptop. Really..!!
If you are a daily reader of my blog, you might have read my post in which I told you how to record songs with Acoustica Mixcraf 5 (Click Here To Read That Post).
Now, I'm gonna tell you how to create your own songs using Acoustica Mixcraft 6 (You can do it with Mixcraft 5also, but I always use latest versions and in Mixcraft 6, some new features have also been added). So lets start our music creation and make our room a studio.
>First of all download Acoustica Mixcraft 6, FL Studio Signature Bundle and Sony Sound Forge Pro and install all of them in your PC and register them (patches and keys are included).
IMPORTANT NOTE: IF YOU ARE CREATING YOUR SONGS TOEARN MONEY , THEN PLEASE BUY THE SOFTWARES FROM THERE OFFICIAL SITE AND SUPPORT THE SOFTWARE CREATORS.
>Now after registering your softwares, open mixcraft 6. You will see this window (If you are using it first time, example project may run, but don't worry, click FILE and click NEW to create new project.
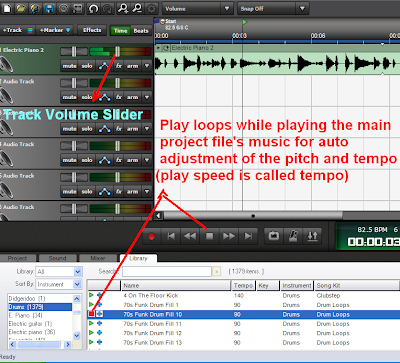
>Now Let me start the project. Suppose you want to create a sad or romantic slow song. So the first thing is tocreate a soulful music for that song. So from your loop library, select the instrument or mood and click play sound to hear the preview of the loop, if you like any loop, just click the "+" symbol to add it in the editing interface's Audio Track. See the image below:
>When you add sound from loop library, mixcraft will adjust the tempo and pitch automatically and will ask your comfirmation. Click YES and your sound will be added in the Sound Track you've selected. Now click PLAYbutton of mixcraft and you will hear the loop playing. You can repeat the loop for unlimited times by clcking "+1 Loop" button. See the image below:
>Now, you've got the first loop. Now, you need to add some drum loops and other instrument loops, if you wish. Then, just go through your loop library and check each loop and if you find anyone which suits your previous loop, add that in second Audio Track (Click "2 Audio Track" track and then add the loop to add it in second track, otherwise it will be overlapped on the first loop and you may feel difficulties with the tracks).
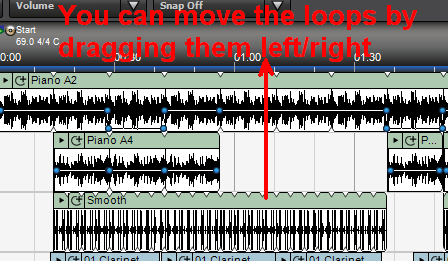
>Remember that while checking other loops, click play button of mixcraft and then play the previews of the loops in loop library. It will be automatically adjusted with the main song tempo and pitch and you will better understand the loops. >Now, click on Snap Settings and select SNAP OFF. >Now, You can drag the loops to move it to the correct position as you want in your song. You can add your loops and adjust them by dragging. You can delete any part from a loop by drag selecting method and pressing delete button. In the same way, you can cut, copy, paste any part of audio at any place of the track.
>You can control volume and pan shifting using the "Change Clip Envelop Type" options. >Now, after completing the music with loops, you need to create the rhythm for your lyrics. Sit for a few minutes and think the rhythm and play it withvirtual instruments of Mixcraft 6 (If you don't know playing musical instruments, then leave this step and think the rhythm in your mind and try to fit that on any lyrics you are writing).
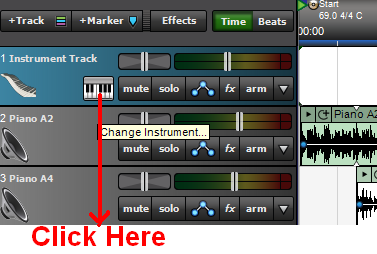
>To insert and play a virtual instrument, right click on any track in mixcraft and click INSERT TRACK and then click VIRTUAL INSTRUMENT TRACK. >You can use virtual instruments to add some more music instead of loops and to make new rhythms for your song. After inserting virtual instrument track, click CHANGE INSTRUMENT button. You'll see the list of instruments installed in your PC. >Now select the instrument category from the left side and select the instrument from right side. Now clickMUSICAL TYPING BUTTON. A piano appears on the screen, you can play it with your keyboard and mouse. It sounds different for different instruments.I have selected Acoustic Guitar's Nylon and Strings.
>Now click File>Mix Down To>MP3 and save the music file as a single mp3 file.
>Now, if you are ready with the lyrics and ready to sing, put your mic up and start recording your song as I explained in my previous post.
>In my previous post, I told you the method to record your song with the karaoke track. Now, I am going to tell you how you can put some effects like echoes, flanger, reverb etc to make your song more professional.
>After you are finished with recording, you need to mute the karaoke track and play the song. Now you will listen your vocals only. If your voice is low, you can increase the volume by moving the volume slider forward and then click on the MIXER tab as show in the image. Then adjust the MID and HIGH rollers of your recorded vocal track to get the satisfactory vocal results. >Now, click the FX tab as shown in the image. The VST effects available in your PC will appear.
NOTE: You can do more and more things with mixcraft 6, and the most important thing is practice. Keep checking all the tabs and options of mixcraft 6 and keep reading the help file. In a few days, you will become expert in music making (if you know playing instruments).
 Hello friends, do you have a good voice to
 I have all these talents and that's why I compose my own music and
You might be thinking that you will have to purchase different musical instruments and go to studios and record your songs there. But NO, you can do all these things alone, just with your PC and the superb software, Acoustica Mixcraft 6.
I use plugins of FL Studio and Sony
You can also create your own albums at your home, without help of any music-man, just on your own PC or Laptop. Really..!!
If you are a daily reader of my blog, you might have read my post in which I told you how to record songs with Acoustica Mixcraf 5 (Click Here To Read That Post).
Now, I'm gonna tell you how to create your own songs using Acoustica Mixcraft 6 (You can do it with Mixcraft 5also, but I always use latest versions and in Mixcraft 6, some new features have also been added). So lets start our music creation and make our room a studio.
>First of all download Acoustica Mixcraft 6, FL Studio Signature Bundle and Sony Sound Forge Pro and install all of them in your PC and register them (patches and keys are included).
>>>DOWNLOAD SONY SOUND FORGE PRO FROM HERE<<<(coming soon...)
IMPORTANT NOTE: IF YOU ARE CREATING YOUR SONGS TO
>Now after registering your softwares, open mixcraft 6. You will see this window (If you are using it first time, example project may run, but don't worry, click FILE and click NEW to create new project.
(Click On The Images To See Enlarged View)
>Now after creating new project, you will see the multi track editing interface of mixcraft 6. Now you need todownload the loops of your loop library. To download the loops, click on "Library" and right click on the loop name and click "DOWNLOAD ALL IN VIEW" and let Mixcraft download the loops. Till the download completes, click HELP and click HELP TOPICS and give a thorough look to the topics to understand the basics of this software's interface and tools.
>I hope your loop library is updated and sounds are downloaded now.>Now Let me start the project. Suppose you want to create a sad or romantic slow song. So the first thing is tocreate a soulful music for that song. So from your loop library, select the instrument or mood and click play sound to hear the preview of the loop, if you like any loop, just click the "+" symbol to add it in the editing interface's Audio Track. See the image below:
>Remember that while checking other loops, click play button of mixcraft and then play the previews of the loops in loop library. It will be automatically adjusted with the main song tempo and pitch and you will better understand the loops. >Now, click on Snap Settings and select SNAP OFF. >Now, You can drag the loops to move it to the correct position as you want in your song. You can add your loops and adjust them by dragging. You can delete any part from a loop by drag selecting method and pressing delete button. In the same way, you can cut, copy, paste any part of audio at any place of the track.
>You can control volume and pan shifting using the "Change Clip Envelop Type" options. >Now, after completing the music with loops, you need to create the rhythm for your lyrics. Sit for a few minutes and think the rhythm and play it with
>To insert and play a virtual instrument, right click on any track in mixcraft and click INSERT TRACK and then click VIRTUAL INSTRUMENT TRACK. >You can use virtual instruments to add some more music instead of loops and to make new rhythms for your song. After inserting virtual instrument track, click CHANGE INSTRUMENT button. You'll see the list of instruments installed in your PC. >Now select the instrument category from the left side and select the instrument from right side. Now clickMUSICAL TYPING BUTTON. A piano appears on the screen, you can play it with your keyboard and mouse. It sounds different for different instruments.I have selected Acoustic Guitar's Nylon and Strings.
>Now play your music and play the guitar/synth/flute etc (as you like) to prepare the rhythm for the lyrics. If you want to record the music of your virtual instrument, you can press record button and record the virtual instrument's rhythm with your song as a different track.
>After doing all these things, check the whole music for the satisfaction that is sounds good and will be fine for your song.>Now click File>Mix Down To>MP3 and save the music file as a single mp3 file.
>Now, if you are ready with the lyrics and ready to sing, put your mic up and start recording your song as I explained in my previous post.
>In my previous post, I told you the method to record your song with the karaoke track. Now, I am going to tell you how you can put some effects like echoes, flanger, reverb etc to make your song more professional.
>After you are finished with recording, you need to mute the karaoke track and play the song. Now you will listen your vocals only. If your voice is low, you can increase the volume by moving the volume slider forward and then click on the MIXER tab as show in the image. Then adjust the MID and HIGH rollers of your recorded vocal track to get the satisfactory vocal results. >Now, click the FX tab as shown in the image. The VST effects available in your PC will appear.
>Now you can select the effects and adjust them to make your voice more fantastic. You can use ACOUSTICA REVERB, ACOUSTICA FLANGER, ACOUSTICA DELAY, IL DELAY BANK and many more VST/DirectX Effects to make your vocals more professional. You can customize the effects by clicking EDIT button in the effects' column. After getting the satisfactory results, unmute the karaoke track and then play the song. Adjust theTRACK VOLUME slider to control the volume of both the tracks.
>Finally, mix your song as mp3 and you're done.
>Send your newly created song to your friends and make them say : "Dude... You are rocking...!!"NOTE: You can do more and more things with mixcraft 6, and the most important thing is practice. Keep checking all the tabs and options of mixcraft 6 and keep reading the help file. In a few days, you will become expert in music making (if you know playing instruments).


0 comments: